 Android app testing with Android Studio (Gradle) and AppThwack
August 28, 2013
August 28, 2013
Heres a quick tutorial to get started with AppThwack, Android Studio and Gradle. Once you’re up and running you’ll be able to kick off tests on our device lab from the IDE or command line. You can run our built-in compatibility tests or run your own (JUnit/Robotium, Calabash, MonkeyTalk, etc), giving you full control over when, what, and where youre testing your app.
Having a problem or interested in contributing? This plugin is open source! Check out the Github page for more details.
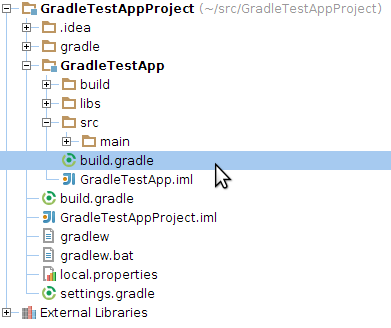
1 To add AppThwack support to an existing Android Studio project, we must modify the project specific build.gradle file. Be sure to select your app specific build.gradle file as the top-level file is for configuration options across all projects.
Adding any custom plugin to Gradle is a simple call to apply plugin.
apply plugin: 'appthwack'
Add the AppThwack plugin+dependencies to the classpath so it can be built.
dependencies {
    //...
    classpath 'com.sun.jersey:jersey-core:1.8'

    // Version needs to match current version of the plugin (See the github readme for current version)
    classpath 'com.appthwack:gradle:1.3'
}
All AppThwack specific configuration happens within the appthwack closure of your build.gradle file. The first step is adding your account API Key, the target project to use and a pool of devices to test on.
appthwack {
    apiKey='...'
    project='My Android App Project'
    devicePool='Top 10 devices'
    // ...
}
{-} Visit https://appthwack.com/user/profile for your API Key.
With the account and project configured, now its time to configure the tests. Within the same appthwack closure, we can configure JUnit/Robotium, Calabash or AppExplorer test runs.
Selecting a JUnit run will automatically use the test APK which is built with your application.
appthwack {
    // ...
    junit (
        'com.appthwack.MyApp.tests#TestFoo' // testFilter
    )
}
{-} The ‘testFilter’ parameter is optional and should be omitted if you wish to run the entire JUnit test suite built with your app.
Selecting a Calabash run will test your newly built application with the selected features.
4 [^calabash-tags]
appthwack {
    // ...
    calabash (
        '/src/app/tests/calabash/features.zip', // path
        '@uitest' // tags
    )
}
{-} The ‘path’ parameter is required and should point to a local copy of your Calabash features zip. [^calabash-tags]: {-} The ‘tags’ parameter is optional and represents a set of Cucumber based tags to pass to Calabash and should be omitted if you wish to run the entire test suite.
Selecting an AppExplorer run will test your newly built application with the AppThwack AppExplorer and Exerciser Monkey.
5 5 [^explorer-launchdata] [^explorer-eventcount] [^explorer-monkeyseed]
appthwack {
    //...
    appexplorer (
        'test_account', // username
        'testpassword123', // password
        '...', // launchdata
        1000, // eventcount
        0 // monkeyseed
    )
}
{-} The ‘username’ parameter is optional and should contain a string value to inject into signin forms. [^explorer-password]: {-} The ‘password’ parameter is optional and should contain a string value to inject into signin forms. [^explorer-launchdata]: {-} The ‘launchdata’ parameter is optional and should contain URI to pass to the launch activity. [^explorer-eventcount]: {-} The ‘eventcount’ parameter is optional and should be the number of events the exerciser monkey should run. [^explorer-monkeyseed]: {-} The ‘monkeyseed’ parameter is optional and is the seed value for the exerciser monkey randomized. Using the same value across runs should yield the same set of events.
Thats it! Now that our build.gradle is complete, lets setup a quick task in Android Studio to upload and run our tests.
We’ll need to add a new Run Configuration in Android Studio so we can quickly start our test runs.
6 Select Run > Edit Configurations from the Android Studio menu bar.
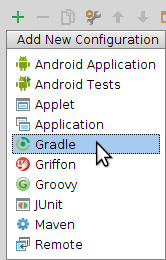
In the Run/Debug Configurations dialog, click the Add New Configuration in the top left-hand corner and add a new Gradle configuration.

Add the appthwackUpload task to your new Run Configuration.
Thats it for Android Studio! Now its time to run our tests.
Now that our configuration is complete, we can kick off AppThwack test runs from Android Studio or directly through Gradle.
7 Select our Run Tests on AppThwack configuration from the drop down on the menu bar and hit play!

All Android Studio projects are packaged with the GradleWrapper, which gives us Gradle command line access from any platform.
$ cd /src/MyApp
$ ./gradlew appthwackUpload
On a successful run from Android Studio or Gradle, your output will look something like this.
...
:GradleTestApp:appthwackUpload
[AppThwack] Using Project 'demoproject'.
[AppThwack] Using DevicePool 'Top 10 devices'.
[AppThwack] Uploading apk 'GradleTestApp-debug-unaligned.apk'.
[AppThwack] Uploading test apk 'GradleTestApp-test-unaligned.apk'.
[AppThwack] Scheduling 'junit' run 'GradleTestApp-debug-unaligned.apk (Gradle)'.
[AppThwack] Congrats! See your test results at https://appthwack.com/project/demoproject/run/24219.
Now you can kick off AppThwack test runs from your shell or IDE. 8
This post was migrated from the AppThwack Blog which is no longer available. A copy of the original post can be viewed from archive.org.