 Continuous Integration for Mobile Apps with AppThwack and Jenkins
September 3, 2013
September 3, 2013

Today, were happy to announce the initial release of our Jenkins plugin, which introduces AppThwack into your Continuous Integration cycle.
As developers ourselves, we understand the importance of seamless tool integrations within the development workflow. Last week we announced the release of our Android Studio/Gradle plugin, which enables testing of Android apps on hundreds of devices directly from your IDE.
Ready to get started? Here’s a quick tutorial to get started with AppThwack, Jenkins and Continuous Integration for mobile apps. Once you’re up and running, you’ll be able to kick off tests on our device lab from your own Jenkins server!
The AppThwack plugin lives in the official Jenkins-CI maven repository. That means you can download/install it directly from within your running Jenkins server.
Starting at the Jenkins homepage, navigate to the Manage Jenkins > Manage Plugins page.
From the plugin view, click the Available tab and scroll to find the AppThwack plugin.

Finally, scroll to the bottom and click Install.
Navigate to Manage Jenkins > Configure System.
Scroll down to the AppThwack settings section to add your API Key. This key is used to authenticate your Jenkins server with AppThwack and is used across all of your Jenkins projects.

Now that your API key added, its time to navigate to a Jenkins project and configure the post-build action.
Navigate to a project of your choice and click Configure button from the left-hand side menu.
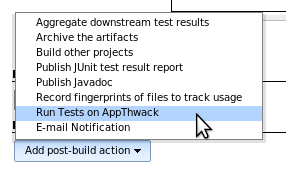
Click the Add post-build action button, select Run Tests on AppThwack and you’ll notice a new, AppThwack specific settings section appear. All remaining configuration will happen here.
First up is selecting your AppThwack project and selecting which devices to test on.
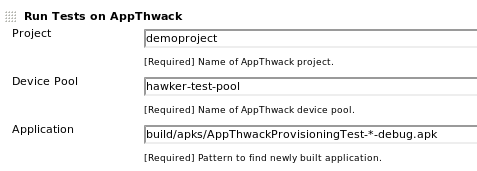
Next up is configuring the plugin to find your newly built mobile app. The application field allows for standard Jenkins (ant) pattern matching with expandable environment variables. Please note that this pattern is relative to the Jenkins workspace currently being used by the project/build.
The next step is selecting which tests you wish to run. If you dont have custom tests written for your app (yet), you can still run the AppThwack built-in compatibility test suites. These suites will Install, Launch, Explore and Stress your app with no code changes necessary.
Lets walk-through configuring some tests for both Android and iOS.
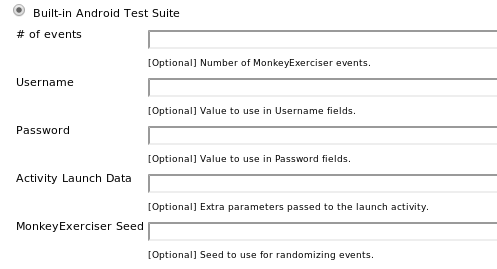
AppThwack provides a built-in compatibility test suite for both Android and iOS.
The built-in Android test suite supports additional options for configuring our AppExplorer. These are optional and should configured on a case-by-case basis.
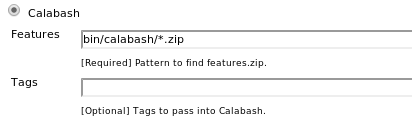
You can run your custom Calabash scripts for both Android and iOS. Please note that the features field supports the same pattern matching and environment variables as the application one above.
Have a JUnit/Robotium project building with your app? Same pattern matching rules apply.

Functional tests on iOS with KIF are supported too; no configuration required

Last, but certainly not least, iOS UI Automation. Same pattern rules apply for finding your Javascript tests.

Click Save as the configuration is complete!
To manually kick off a build from a Jenkins project, click the Build Now button from the left-side menu.
Once your app builds successfully, an examination of the Console Output will yield the following:
...
[AppThwack] Using Project 'demoproject-ios'
[AppThwack] Using DevicePool 'hawker-test-pool-ios'
[AppThwack] Archiving artifact 'IOSTestApp.ipa'
[AppThwack] Using App '/home/ahawker/src/appthwack-jenkins/work/jobs/test/builds/2013-08-30_17-54-09/archive/IOSTestApp.ipa'
[AppThwack] Archiving artifact 'calabash.zip'
[AppThwack] Using 'calabash' test content from '/home/ahawker/src/appthwack-jenkins/work/jobs/test/builds/2013-08-30_17-54-09/archive/calabash.zip'
[AppThwack] Scheduling 'calabash' run 'IOSTestApp.ipa (Jenkins)'
[AppThwack] Congrats! See your test run at https://appthwack.com/project/demoproject-ios/run/24549
Finished: SUCCESS
You’re done! You can now schedule tests on AppThwack from your own Jenkins Continuous Integration server!
Using the AppThwack Jenkins plugin (or any of our tools) in your development process? Let us know! Wed love to hear success stories and feedback about how we can improve our integration into your workflow.
This post was migrated from the AppThwack Blog which is no longer available. A copy of the original post can be viewed from archive.org.